
Here's the inside scoop on my next RGW 4-string lefty build:
- VRB-DS4L model (P-bass body shape)
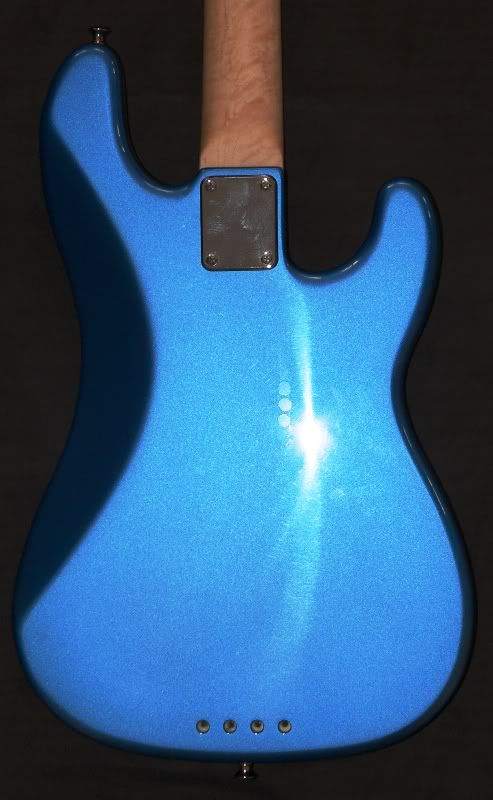
- Alder body finished in Lake Placid Blue metallic
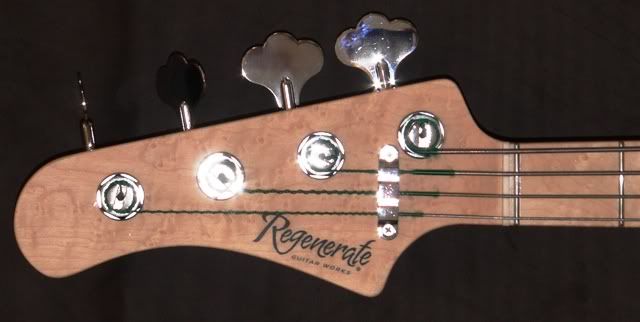
- birdseye/birdseye 21-fret neck, graphite stiffened, satin finish
- Hammon Engineering Darkstar pickup
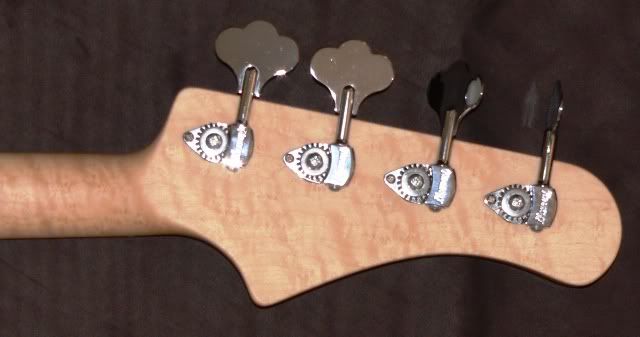
- Hipshot Ultralight tuners
- Hipshot Type A bridge (with thru-body string option)
- white Pearloid pickguard
- chrome hardware
- passive Vol / Tone controls
I'm still debating over the nut width for this one - 1-1/2" or 1-5/8" ... and leaning towards the 1-1/2" nut simply because I already have a finished neck in stock. The Lake Placid Blue metallic body color and birdseye neck woods are upgrades over the basic VRB-DS4 model specs
The body should be back from the finishing shop this week or early next. I'll post images when the body arrives, and again when I have this one wrapped up and ready to put on the market.
all the best,
R
RGW Darkstar build - VRB-DS4L model
Moderator: Rodent
RGW Darkstar build - VRB-DS4L model
Moderator: Blueprinting and Bondo
Pickups: Honey Badger Pickups - Like Honey Badger Pickups on Facebook!
Basses: Regenerate Guitar Works - Like Regenerate Guitar Works on Facebook!
Pickups: Honey Badger Pickups - Like Honey Badger Pickups on Facebook!
Basses: Regenerate Guitar Works - Like Regenerate Guitar Works on Facebook!
Re: RGW Darkstar build - VRB-DS4L model
Sounds like it's gonna be another cool build!
Can't wait to see it.
Cheers!
Can't wait to see it.
Cheers!
"Nothing is what is seems, but everything is exactly what it is." B. Banzai

Re: RGW Darkstar build - VRB-DS4L model
Sounds yummy indeed.
http://www.facebook.com/profile.php?id= ... ef=profile
www.twitter.com/ReallyMattRoss
Penguins is practically chickens.
www.twitter.com/ReallyMattRoss
Penguins is practically chickens.
Re: RGW Darkstar build - VRB-DS4L model
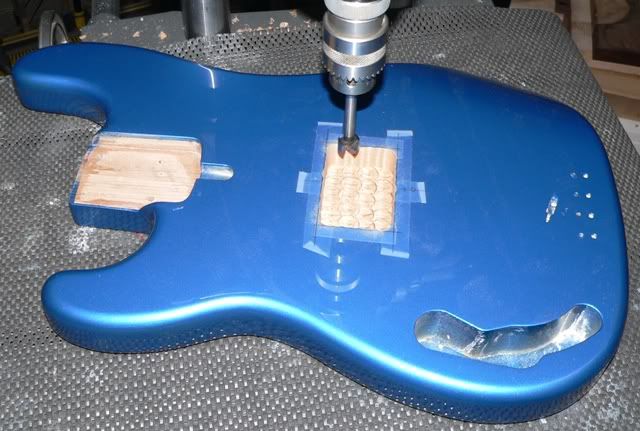
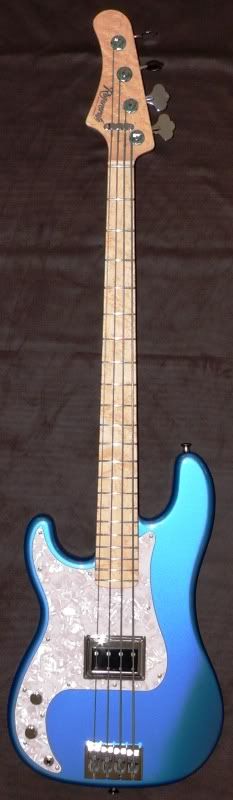
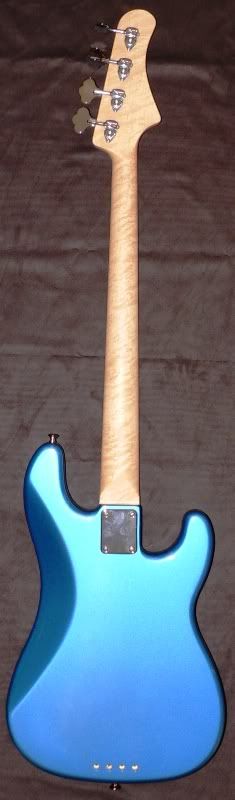
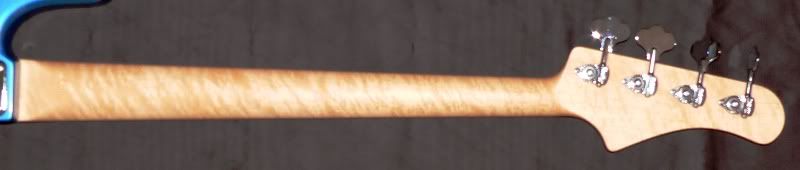
I opted for the Birdseye/Birdseye J width neck for this one. Here's a peek at what the body and neck look like together
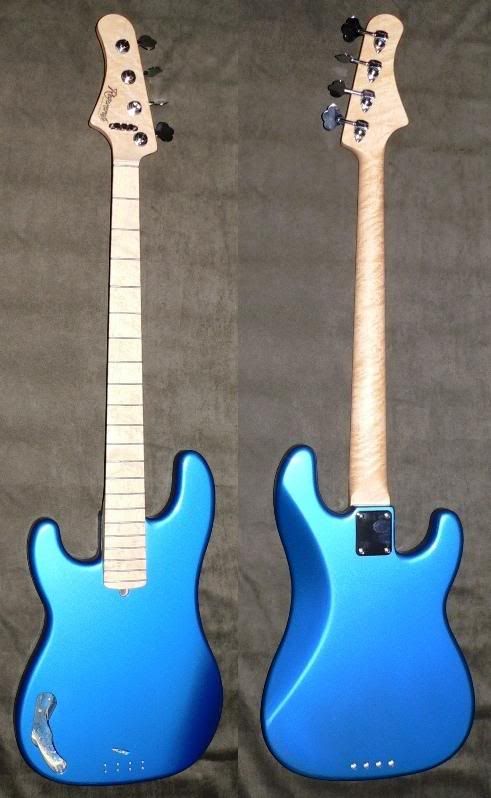
I need to take them back apart so I can route the Darkstar pickup cavity, drill the wire tunnel to the control cavity, and route the pickup hole in the pickguard (once it arrives in the coming week or so.) From there it's a rather simple assembly and set-up job
all the best,
R
I need to take them back apart so I can route the Darkstar pickup cavity, drill the wire tunnel to the control cavity, and route the pickup hole in the pickguard (once it arrives in the coming week or so.) From there it's a rather simple assembly and set-up job
all the best,
R
Moderator: Blueprinting and Bondo
Pickups: Honey Badger Pickups - Like Honey Badger Pickups on Facebook!
Basses: Regenerate Guitar Works - Like Regenerate Guitar Works on Facebook!
Pickups: Honey Badger Pickups - Like Honey Badger Pickups on Facebook!
Basses: Regenerate Guitar Works - Like Regenerate Guitar Works on Facebook!
Re: RGW Darkstar build - VRB-DS4L model
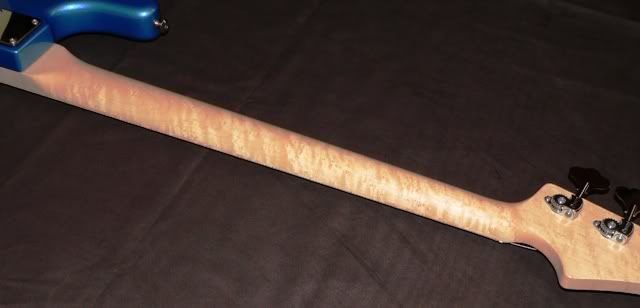
the white Pearloid pickguard arrived over the weekend. I snapped this image while measuring for the Darkstar placement
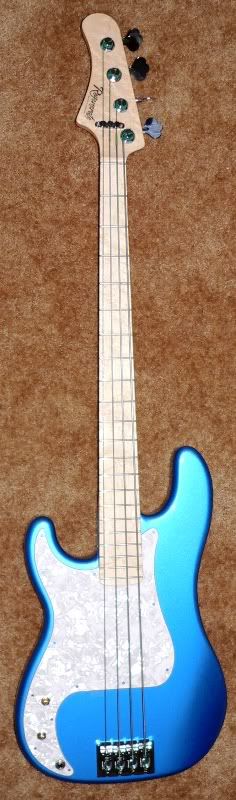
now it's time to head out to the shop and route the rather cavernous Darkstar pickup cavity. once it's set I'll then route the pickguard to suit ...
all the best,
R
now it's time to head out to the shop and route the rather cavernous Darkstar pickup cavity. once it's set I'll then route the pickguard to suit ...
all the best,
R
Moderator: Blueprinting and Bondo
Pickups: Honey Badger Pickups - Like Honey Badger Pickups on Facebook!
Basses: Regenerate Guitar Works - Like Regenerate Guitar Works on Facebook!
Pickups: Honey Badger Pickups - Like Honey Badger Pickups on Facebook!
Basses: Regenerate Guitar Works - Like Regenerate Guitar Works on Facebook!
Re: RGW Darkstar build - VRB-DS4L model
I would have the pickup cavity and pickguard modifications completed this evening if I could have found my roll of double-stick tape  it's in a moving box in the garage, I just know it!
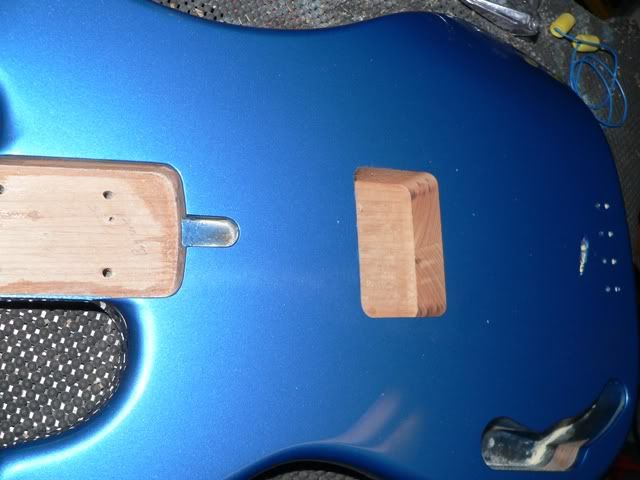
well at least the cavity is roughed and ready for clean-up with a router and template. here's what I got done tonight ...
after I had the bridge, pickguard, and neck located (previous post above), I located the centerline and transferred this to tape on the body top. after a quick disassemble I located the cavity position and marked it off
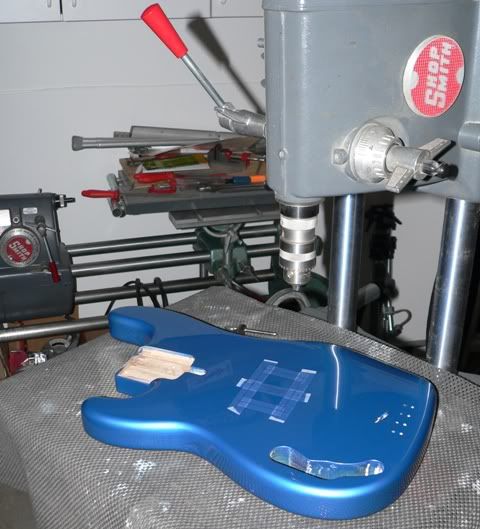
utilizing a 5/8" Forstner bit I first located holes near the corners of the cavity, and drill ed them about 1/8" shy of the finished bottom depth
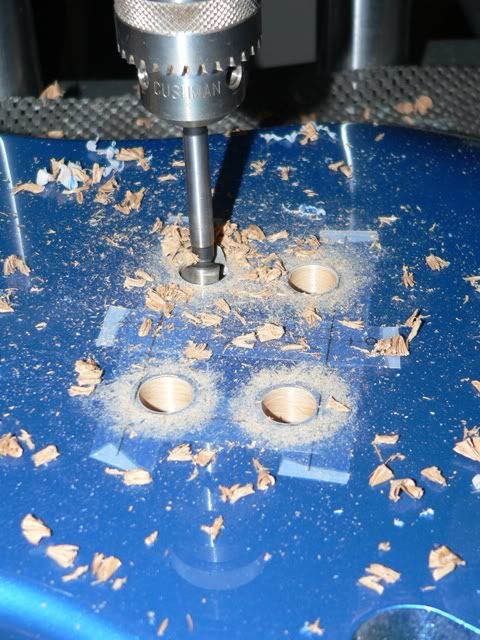
and then traced around the inside of the cavity to outline the routed area
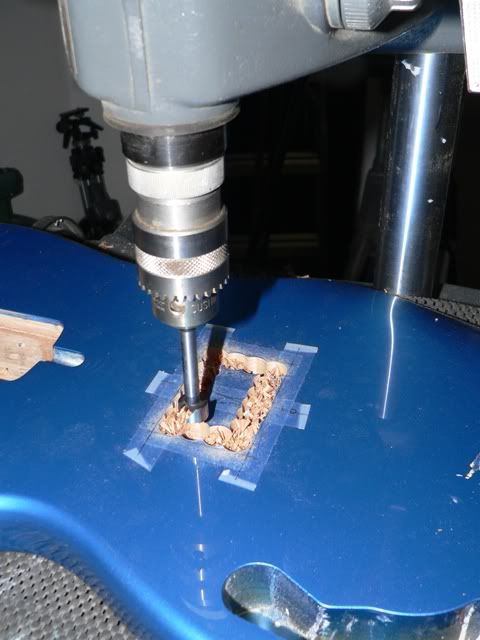
before clearing out the remainder of excess material inside the cavity area
I'll be stopping at Home Depot during lunch tomorrow to pick up a roll of double-stick tape
O ... working on a finished body is still S-C-A-R-Y even after all the bodies I've done this way before. all it takes is a momentary lapse of concentration and whamo! there's a big scratch in the finish
all the best,
R
well at least the cavity is roughed and ready for clean-up with a router and template. here's what I got done tonight ...
after I had the bridge, pickguard, and neck located (previous post above), I located the centerline and transferred this to tape on the body top. after a quick disassemble I located the cavity position and marked it off
utilizing a 5/8" Forstner bit I first located holes near the corners of the cavity, and drill ed them about 1/8" shy of the finished bottom depth
and then traced around the inside of the cavity to outline the routed area
before clearing out the remainder of excess material inside the cavity area
I'll be stopping at Home Depot during lunch tomorrow to pick up a roll of double-stick tape
O ... working on a finished body is still S-C-A-R-Y even after all the bodies I've done this way before. all it takes is a momentary lapse of concentration and whamo! there's a big scratch in the finish
all the best,
R
Moderator: Blueprinting and Bondo
Pickups: Honey Badger Pickups - Like Honey Badger Pickups on Facebook!
Basses: Regenerate Guitar Works - Like Regenerate Guitar Works on Facebook!
Pickups: Honey Badger Pickups - Like Honey Badger Pickups on Facebook!
Basses: Regenerate Guitar Works - Like Regenerate Guitar Works on Facebook!
Re: RGW Darkstar build - VRB-DS4L model
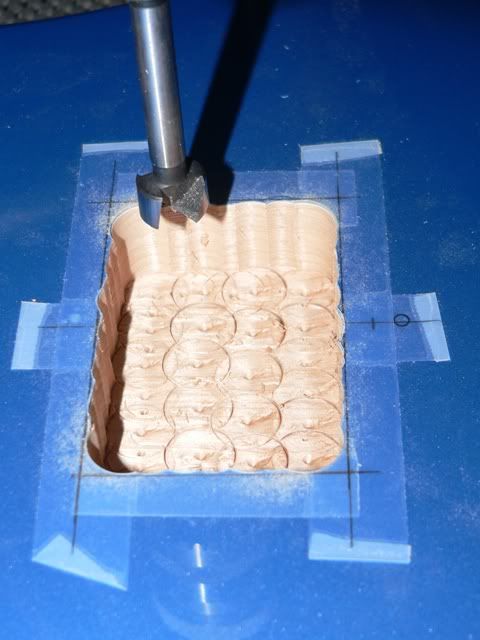
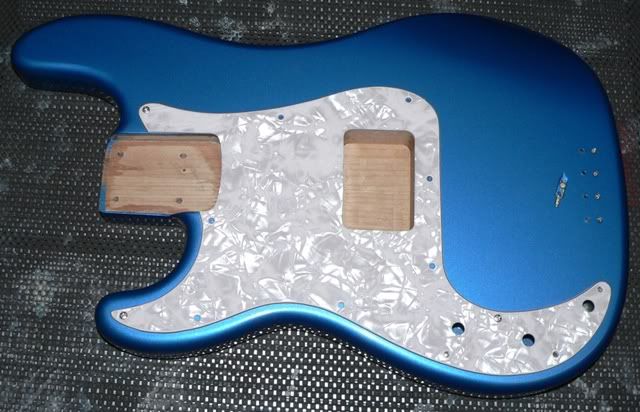
armed with a fresh roll of double-stick tape, I cleaned up the cavity route last night by utilizing a homemade routing template I constructed for my first Darkstar install back in 2006
the final cleaned-up cavity looks like this
now it's time to reinstall the pickguard so I can add the pickup route in it. stay tuned ...
all the best,
R
the final cleaned-up cavity looks like this
now it's time to reinstall the pickguard so I can add the pickup route in it. stay tuned ...
all the best,
R
Moderator: Blueprinting and Bondo
Pickups: Honey Badger Pickups - Like Honey Badger Pickups on Facebook!
Basses: Regenerate Guitar Works - Like Regenerate Guitar Works on Facebook!
Pickups: Honey Badger Pickups - Like Honey Badger Pickups on Facebook!
Basses: Regenerate Guitar Works - Like Regenerate Guitar Works on Facebook!

Re: RGW Darkstar build - VRB-DS4L model
Very cool! what do you do to get such a smooth finish to the inside of the pickup cavity?
Re: RGW Darkstar build - VRB-DS4L model
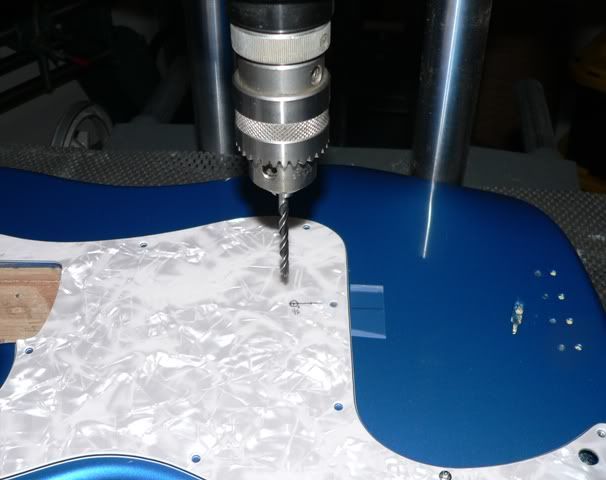
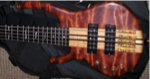
I use a configuration similar to this image

the bearing on the bit shank rides along the inner edge of the cavity template, giving the edges a super clean cut. I leave the cavity route 1/16" shy before my final pass - this leaves the router bit cutting next to nothing on the final bottom pass so it is also nice and smooth
I have a micro-adjust depth adjustment feature on my router, so it's super easy to dial in the depth in 1/128" increments
all the best,
R
Moderator: Blueprinting and Bondo
Pickups: Honey Badger Pickups - Like Honey Badger Pickups on Facebook!
Basses: Regenerate Guitar Works - Like Regenerate Guitar Works on Facebook!
Pickups: Honey Badger Pickups - Like Honey Badger Pickups on Facebook!
Basses: Regenerate Guitar Works - Like Regenerate Guitar Works on Facebook!
Re: RGW Darkstar build - VRB-DS4L model
tonight's activity completed modifications to the pickguard, so everything is pretty much ready to start shielding and then assembly
to get started I disassembled the components and then marked the edge of the cavity onto a piece of tape I stuck to the pickguard. I then measured over an extra 1/2" and marked this as the center location for the pilot hole I need for the router bit
after the pilot hole was installed, the pickguard was covered with protective tape to eliminate any scratching that would otherwise occur when moving the router face plate around the pickup cavity wall

since I'm using a 3/8" dia flush trim bit configuration, I wanted to have at least a 1/2" hole to poke the bit into before turning the router on (safety issue) ... once this was done I simply allowed the router bit bearing to follow the contour of the pickup cavity to cut a matching hole in the pickguard material. the difference between the bit configuration I used tonight and the one I used earlier for the pickup route is in the placement location of the bearing that guides the cutters

after removing the tape and vacuuming off the debris, the completed pickguard pickup route looks like this
all totalled, tonight's work took about 20 minutes (most of which was spent changing tools between steps)
it'll be about a week before I update this thread as I'm waiting for a new can of shielding paint to arrive. more then ...
all the best,
R
to get started I disassembled the components and then marked the edge of the cavity onto a piece of tape I stuck to the pickguard. I then measured over an extra 1/2" and marked this as the center location for the pilot hole I need for the router bit
after the pilot hole was installed, the pickguard was covered with protective tape to eliminate any scratching that would otherwise occur when moving the router face plate around the pickup cavity wall
since I'm using a 3/8" dia flush trim bit configuration, I wanted to have at least a 1/2" hole to poke the bit into before turning the router on (safety issue) ... once this was done I simply allowed the router bit bearing to follow the contour of the pickup cavity to cut a matching hole in the pickguard material. the difference between the bit configuration I used tonight and the one I used earlier for the pickup route is in the placement location of the bearing that guides the cutters
after removing the tape and vacuuming off the debris, the completed pickguard pickup route looks like this
all totalled, tonight's work took about 20 minutes (most of which was spent changing tools between steps)
it'll be about a week before I update this thread as I'm waiting for a new can of shielding paint to arrive. more then ...
all the best,
R
Moderator: Blueprinting and Bondo
Pickups: Honey Badger Pickups - Like Honey Badger Pickups on Facebook!
Basses: Regenerate Guitar Works - Like Regenerate Guitar Works on Facebook!
Pickups: Honey Badger Pickups - Like Honey Badger Pickups on Facebook!
Basses: Regenerate Guitar Works - Like Regenerate Guitar Works on Facebook!
Re: RGW Darkstar build - VRB-DS4L model
I found myself with some free-time this afternoon and decided to use copper foil to do the shielding job instead of waiting until Thursday when the shielding paint arrives. I prefer shielding paint on top routed P-bass style cavities due to the non uniformity of the cavity shape, it's narrow curves, and the overall pain it is to form copper foil to the tight space. I should also mention that copper foil cuts easily - both with scissors and thru my calluses
I usually form the copper foil to the cavity sides and then fill in the bottom with the final piece (it looks nicer this way) ... but for some reason I did it backwards on the Darkstar cavity. no biggie as both ways work just the same. once I have all the foil stuck in place I follow-up by soldering all of the seams. I also add copper foil under the bridge and solder the grounding lead to it so that I have a solid ground connection that holds-up to repeated removal/installation of the bridge long after the bass leaves my shop. if you look closely at the control cavity you can see the bridge grounding wire end that will be connected to common ground
here's what the nearly complete job looks like after soldering. all that remains is to connect the pickup cavity and control cavity with a ground lead. this is run thru the pickup lead tunnel, and then soldered into the near corner of each cavity
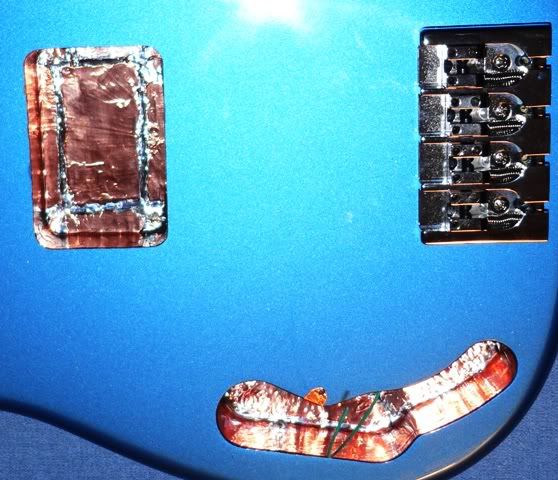
I also need to locate a few additional copper tabs where the pickguard mounts so that the copper shielding foil under the pickguard will firmly contact the cavity shielding and form a boxed enclosure
all the best,
R
I usually form the copper foil to the cavity sides and then fill in the bottom with the final piece (it looks nicer this way) ... but for some reason I did it backwards on the Darkstar cavity. no biggie as both ways work just the same. once I have all the foil stuck in place I follow-up by soldering all of the seams. I also add copper foil under the bridge and solder the grounding lead to it so that I have a solid ground connection that holds-up to repeated removal/installation of the bridge long after the bass leaves my shop. if you look closely at the control cavity you can see the bridge grounding wire end that will be connected to common ground
here's what the nearly complete job looks like after soldering. all that remains is to connect the pickup cavity and control cavity with a ground lead. this is run thru the pickup lead tunnel, and then soldered into the near corner of each cavity
I also need to locate a few additional copper tabs where the pickguard mounts so that the copper shielding foil under the pickguard will firmly contact the cavity shielding and form a boxed enclosure
all the best,
R
Moderator: Blueprinting and Bondo
Pickups: Honey Badger Pickups - Like Honey Badger Pickups on Facebook!
Basses: Regenerate Guitar Works - Like Regenerate Guitar Works on Facebook!
Pickups: Honey Badger Pickups - Like Honey Badger Pickups on Facebook!
Basses: Regenerate Guitar Works - Like Regenerate Guitar Works on Facebook!
Re: RGW Darkstar build - VRB-DS4L model
this one is just about wrapped-up ... I'll be installing the Darkstar pickup on Friday night, and depending on how much available time I have I'll also give this one a set-up and install the strap locks and it'll be ready to offer up for sale
I'm pleased with how it sounds acoustically, and I'm hoping that the Darkstar will once again blow away everything in the studio that night.
any lefties going to be thru the Seattle area in the coming week or two that could be convinced to lay a couple reference lines down to a click track?
all the best,
R
p.s. I'll be visiting Vancouver/Victoria in early May and I might have space to bring this bass and the Honeyburst J along in case somebody wanted to give one/both of them a spin
Moderator: Blueprinting and Bondo
Pickups: Honey Badger Pickups - Like Honey Badger Pickups on Facebook!
Basses: Regenerate Guitar Works - Like Regenerate Guitar Works on Facebook!
Pickups: Honey Badger Pickups - Like Honey Badger Pickups on Facebook!
Basses: Regenerate Guitar Works - Like Regenerate Guitar Works on Facebook!
-
fivebass52
- Posts: 3628
- Joined: November 26th, 2008, 6:14 am
- Location: Oahu, Hawaii
- Contact:
Re: RGW Darkstar build - VRB-DS4L model
Nice work so far! Thanks for the updates and steps... If I was in the mainland, I'd drive from wherever to lay down some tracks for you, just to try out a great looking bass with Darkstars in it!
Aloha,
Ian
Aloha,
Ian
R&B Stretch Bass, Walter Woods 1000w Green-Light Stereo Amp, AccuGroove El Whappo and TR112, assorted axes, amps, cabs...
http://www.myspace.com/thestrangershawaii
http://www.myspace.com/thestrangershawaii
Re: RGW Darkstar build - VRB-DS4L model
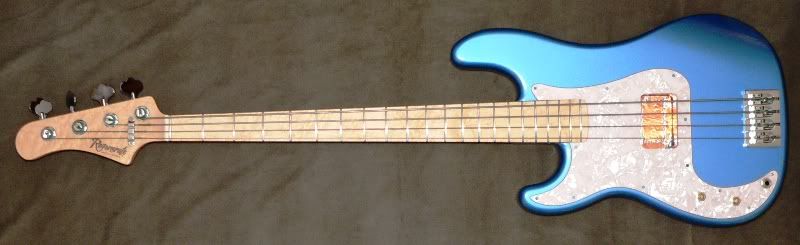
all wrapped up! I have a session scheduled at a friend's studio at 3P Sun to record a few clips of this project. I'll get those uploaded to my website ... and then this one will be listed up for sale early this coming week
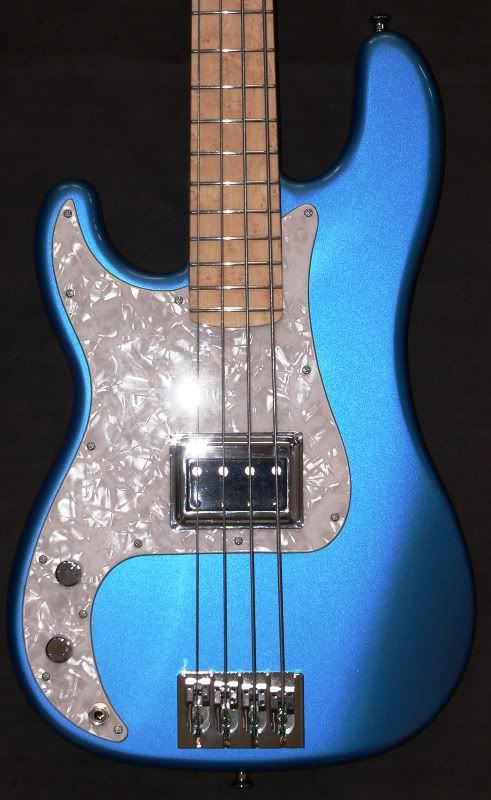
edited to add that this bass did not disappoint in my first amplified 'getting to know each other' session here in my workshop. now I'm STOKED about getting this into the studio on Sun ... 20 hours to go until we roll digital 'tape'
all the best,
R
edited to add that this bass did not disappoint in my first amplified 'getting to know each other' session here in my workshop. now I'm STOKED about getting this into the studio on Sun ... 20 hours to go until we roll digital 'tape'
all the best,
R
Moderator: Blueprinting and Bondo
Pickups: Honey Badger Pickups - Like Honey Badger Pickups on Facebook!
Basses: Regenerate Guitar Works - Like Regenerate Guitar Works on Facebook!
Pickups: Honey Badger Pickups - Like Honey Badger Pickups on Facebook!
Basses: Regenerate Guitar Works - Like Regenerate Guitar Works on Facebook!
VRB-DS4L Sound Clips
a pair of sound clips for your listening pleasure
http://regenerateguitarworks.com/wp-con ... meters.mp3
http://regenerateguitarworks.com/wp-con ... ntsong.mp3
in contrast, here's a VRB-P4 (with DA flats and a Nordstrand NP-4) I built a while back recording the same tracks
http://regenerateguitarworks.com/wp-con ... meters.mp3
http://regenerateguitarworks.com/wp-con ... ntsong.mp3
all the best,
R
http://regenerateguitarworks.com/wp-con ... meters.mp3
http://regenerateguitarworks.com/wp-con ... ntsong.mp3
in contrast, here's a VRB-P4 (with DA flats and a Nordstrand NP-4) I built a while back recording the same tracks
http://regenerateguitarworks.com/wp-con ... meters.mp3
http://regenerateguitarworks.com/wp-con ... ntsong.mp3
all the best,
R
Moderator: Blueprinting and Bondo
Pickups: Honey Badger Pickups - Like Honey Badger Pickups on Facebook!
Basses: Regenerate Guitar Works - Like Regenerate Guitar Works on Facebook!
Pickups: Honey Badger Pickups - Like Honey Badger Pickups on Facebook!
Basses: Regenerate Guitar Works - Like Regenerate Guitar Works on Facebook!

Re: RGW Darkstar build - VRB-DS4L model
Yes please!Rodent wrote:
p.s. I'll be visiting Vancouver/Victoria in early May and I might have space to bring this bass and the Honeyburst J along in case somebody wanted to give one/both of them a spin